Saturday, December 31, 2011

Into The New Year

today is the last day of 2011, Happy New Year everyone!!!!!

looking back, 2011 have been so busy and i'm kinda glad it's over. 2011 was all about planning for me (i'm sure you all know why ... haha) and one thing i've learn through all of my planning is that, no matter how well you plan, things changes, and you compromise and make adjustments. after spending all this past year on the wedding planning, i am amazed by the people who choose to be an event planner. it's hard work and it's stressful. you have to be resourceful and organized if you were a planner. on one hand, i'm glad that i had lots of time for me to get organized, on the other, it has been hard for me to make quick decision because i thought i could have more time to think things through. after a year of planning my wedding, my advise to other brides is, if you are planning a small wedding with approx 50 guests, unless you are like me that want to have everything DIY, plan your wedding in a short amount of time say 6 to 9 months and make quick decisions. listen to your guts and don't over think every little details, because no matter how well you plan, there will always be some last minute changes you'll need to make. and though you don't need to have ten different back up plans, always make sure you at least have one or two back up so you won't freak out when things isn't going as you thought. better yet, hire a planner and have them do all the work for you, and if you do make sure you communicate well with them and let them know what you think.

Friday, December 30, 2011

The Final Bridesmaid Dress

a while back i wrote on a post saying that i've picked out a dress for my sister on my wedding day. i was really excited when it became available to purchase and i didn't waste any time to buy the dresses. i loved that dress so much that i even order one for myself. now, here's the thing about online shopping, you'll never know for sure if the product is up to your expectation and would never know if it fits or not. i've had some good and bad experiences before with online shopping, but so far, with my luck, 95% of the time when i shop online, things come out that way i hoped if not better. but this time ... oh boy ... i don't even know how to put it into words of how disappointed i was with the dress. it wasn't even anywhere near the image they had online! i just HAVE to return it and i did.

so what happens now with my sisters bridesmaid dresses? panicking not knowing what to do, i kept my eyes out for anything that i could possibly use as bridesmaid dresses. though my last experience with online shopping was not pleasent, i didn't give up on that and just had to try one more time when i found this dress from j crew and it is even in the same colour tone of our theme. i ordered it in no time and because it was very close to christmas, i got it with a great deal (25% off with free shipping and no tax). when the dress came, it still appeared a bit darker then the picture on the website but i'm happy with it, and my sisters too, are very happy with it. and now we are all going to look nice on my wedding ... yeah!!!

Thursday, December 29, 2011

Save The Date! Vancouver Edition

since both roy and i have lived in Vancouver for almost a decade, we thought it'd be nice to have a little celebration in Vancouver after our wedding in Hong Kong to share the special moment of our life with our dear friends in Vancouver so please save the date for our celebration! and we will keep you posted about this event (invitation to follow).

image credit to Jamie Delaine Photography

Sunday, December 18, 2011

Gift Tags

over this past year of "researching" on wedding blogs, i was inspired to have a DIY wedding with absolutely everything handmade by myself. hair piece, veil, decor, flowers, stationaries, everything were handmade. i started early, almost 10 months ago, i am almost done with all the bigger project - flowers and decor, and have recently moved onto smaller ones.

a couple of months ago, after spending over seven months of flower making, i decided it's time to take a break from the flowers and get started on other smaller projects - the favor gift tags. i like the idea of using vintage looking Manila tags and it certainly had been a hit in recent wedding trend. people use them for place cards, for their guest books, favor tags and such. i really like the idea, but i didn't want to be the same as everyone else - that is buying Manila tags, decorating them with Washi tapes, then stamp them with rubber stamp for your message. i want it to be personal, handwritten and unique. so i decided to make my very own Manila tags.

although i wanted my tag to be hand written, of cause i wasn't going to really hand write all of the tags myself. for one, i am pretty sure if i hand write them all, they will all look different, and two, i will probably mess up so much that i might need to write about a thousand of them to get a hundred.

few months before i started this project, i came a cross a blog by a girl name Elise Blaha that gave me some inspiration on to how to create these gift tags of mine. but i don't have a adobe photoshop at home and i woasn't going to spend hundreds of dollars for just one tiny little project so i came up with the idea of using a scanner, the adobe reader 9, the microsoft word, the PrtScn button and a basic photo editing software such as paint. some other supplies i also need are: cream color card stock, different sizes signiture marker, mt masking tapes, cutter, cutting mate, scissors and a hole punch.

first, like elise, i wrote my message randomly on the paper. then i scanned the image onto the computer as a pdf file and open it with adobe reader 9. then i highlight the images that i like, copy it and then paste it on to a new word doc. and finally play around with the arrangement and create my own design. after i figure out the how i would like me message to be, i zoomed in and made the image really big and click the PrtScn button to capture an image just like this 
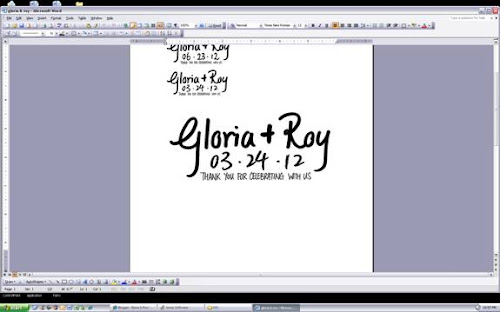
then, paste the printed screen on to a simple photo editing software such as Paint and crop out the final image of the tag and paste it once again on a word doc. like thiscreate a table in the size of the tag that i like copy and paste the image of the tag onto all of the spaces, print it out onto a card stock paper, trim them, stick tape on them, and then hold punch them .... and there you go ... DIY Marina gift tags